Showing posts with label MDF shapes. Show all posts

Sunday, 13 September 2015

We've gone all Steampunk!

Hello there,

Over on That Craft Place Blog we've gone all Steampunk for the challenge this fortnight and if you check out the Etsy Store you'll be able to find some absolutely awesome digital images to choose from to join in.

Here's my DT inspiration using Set Sail Steampunk Style


Steampunk always scares me just a little bit, I just love the style but I am in awe of some just inspiring Mixed Media artists out there that just blow me away with their creations that I feel a little tentative about approaching it myself!  So this took a week of thinking to put together as a result lol

Here's what I used to make it:
Style: Tent Fold A6
Theme: Steampunk
Image: Set Sail Steampunk Style, That Craft Place Etsy Store
Spectrum Noir Markers:
Skin: TN3, FS9, 6, 4, 2
Hair: True Black, BGR2, 3, 5
Clothes & bits: CG2, IG4, 6, DR6
Background: GB2, 4, 6
Materials:
160gsm Super Smooth Card, That Craft Place
Graphic 45 8x8 Typography Pad, That Craft Place
MDF shapes by That Craft Place
DecoArt Crackle Paint & gloss medium, That Craft Place
Crafter’s Companion Matt Black card

Tim Holtz Accessories Writing Desk Bigz die

And a few more pics:


I just love how the MDF and the ink bottle turned out, so I can see more of this type of embellishment coming your way lol

Thank you so much for stopping by and please pop by the That Craft Place Challenge Blog because trust me, my uber talented teamies on the design team have some real corkers for you this time :D

Crafty Hugs

Sandie xxx

Challenges:
http://lilpatchofcraftyfriends.blogspot.co.uk/ 17
http://craftingfromtheheartchallengeblog.blogspot.co.uk/ 76
http://papertakeweekly.blogspot.co.uk/ wings
http://pennyschallenges.blogspot.co.uk/ 244
http://notjustcardschallenges.blogspot.co.uk/ 24 Mthly Sept
http://tuesdaythrowdown.blogspot.co.uk/ 261
http://www.addictedtostamps-challenge.blogspot.com.au/ 161
http://inspirationdestinationchallengeblog.blogspot.co.uk/2015/09/ag-no-50.html 50

Monday, 20 July 2015

MDF transformed by our Zoe :D

Hello there,

A quick pop in today to share an MDF make that one of our twin's, Zoe, built covered and sealed herself.

Zoe (almost 16!  how did that happen!) has just set off for her 2nd residential as a part of the National Citizenship Service, which is a fabulous opportunity for her and we are so proud that she grabbed the chance to so it.  BUT she was away all last week on an outward bounds adventure, home for the weekend and she's off again till Friday!  One week was bad enough for a Mummy, let alone 2!  I'm sure many of you will know exactly how I feel lol  But at least she has wi-fi and a signal this week so I can stalk her and make sure she isn't being eaten by some big monster or other irrational invention of the Mummy brain!

So, back to her make...a while ago I ordered one of the totally gorgeous MDF Remote/Phone holders from That Craft Place and gave it to Zoe to make as a way of getting her to relax during her exams.  She loves altered art and transforming stuff so these MDF makes are just the right thing for her.  Lisa Horton designs the most amazing laser cut projects that are such high quality and fit together so well that once you buy one, trust me you are hooked!

Here is what Zoe did with it....


Everything she used is available at That Craft Place who you really must check out.  Their web address for the bricks and mortor shop is www.thatcraftplace.co.uk

Materials:
My Minds Eye Chalkboard 12x12 paper pad, MDF laser cut Remote/Phone Holder, Black Gesso, Paint brush, Matt Medium and Gloss Medium by decoart - that's it apart from scissors!

To make it, she thought ahead (which I have got to say never occured to me lol) and drew around the MDF parts on scrap paper BEFORE she put it together and painted it black!  There's a top TIP, as she then had a template for the papers she used to cover it!  doh!  One of the many many reasons I love her so much lol

Another TOP TIP (mine this time lol) was to make sure she sanded the edges of the paper at a 45 degree angle to finish the paper edges.  This doesn't only make it look better and adds a little distressed effect but it also helps the paper bond to the MDF and completes the seal (reduces peeling later).

Here's some more pics:


Thank you so much for stopping by and taking a peek at Zoe's project and if you would like to leave her a comment she would love to hear your thoughts :D

Crafty Hugs

Sandie and Zoe xxx

Challenges entered on Zoe's behalf:
http://lilpatchofcraftyfriends.blogspot.co.uk/ 14
http://a-step-in-the-darkness.blogspot.co.uk/ 25
http://inspirationdestinationchallengeblog.blogspot.co.uk/2015/07/AG-no-42.html 42
http://simplypapercraftsforalloccassions.blogspot.co.uk/ 9
http://creativefingerschallengeblog.blogspot.co.uk/ 87
http://craftyhazelnutspatternedpaper.blogspot.co.uk/ July

Sunday, 29 March 2015

Altered Heart for Easter...

Hello Again,

Well it's challenge time again over at That Craft Place Challenge Blog and this one had me a little flummoxed!  The theme is Easter or Spring.... but naughty Erin added the Spring after I had spent an age trying to come up with an Easter project as I don't make Easter cards!  But I'll get her back later and go back to telling you about my Easter make lol

So, Easter really does mean different things to different people, faiths and cultures and even between members of my family, so I decided to go with the more religious side as my OH and youngest daughter would love it and sometimes the rest of us forget that!

As I was way outside my comfort zone already, I decided to go for a mixed media make and really hang myself out there!  So here is my make incorporating The Cross on the hill...

Handmade twisted wire Cross, altered with paint and Pinflare Buff It

Front View

Side view to show the 3D effects
Here's the how's - but I thought I'd add my first ever blogland tutorial...

MATERIALS: Everything I used to make this can be purchased from the wonderful Lisa Horton at That Craft Place.  I will add the products used under each picture, so you know when I used them :D

MDF or greyboard heart base; coat with Gesso and then I used matt medium to make the paper mache hill (I used pages from an old book ripped up into approx 2x2 cm square'ish shapes).  You may notice my very expensive paint palette! hehe See I never throw if I can reuse...packaging makes a great palette!

I then added strips of spiders web material, for its texture (mine is only green so you could see it, it will be painted so it doesn't matter what colour you use) and I roughly cut a cloud shape from lace.  Both were stuck with the matt medium.

Now the fun bits....after putting another covering of Gesso to everything, I then painted the 'hill' in metallic green liquid acrylic paint 

Then I used a dry brush to swipe across the sky with blue acrylic paint.  The blue was toned down by adding a touch of brown acrylic to the paint as I wanted a 'moody' feel to the piece.  By dry brush I mean, add a little paint to a dry brush then on scrap paper swipe the brush to take off most of the paint, then when there is very little left swipe across your piece.

I then added red acrylic, toned down with brown acrylic to the whole piece.  Again, it was dry brushed so not to add too much and so it also picks up the texture of the materials.

Finally I added Pinflare Buff It in antique silver (use it the same as gilding wax) to parts of the sky and hill.  I just picked out bits that I wanted to highlight to show depth and texture.  Build this up to suit your design, a little at a time.

This pic of the finished piece shows the Buff It a little better, just touches that pic up the light.

The bubbles you can see where a happy accident!  I used a heat gun to dry layers as I am soooo impatient and the Gesso bubbled leaving this effect (because I'd heated it too long in one place lol), however, I love the effect it left!

And there you have it...
I really enjoyed this and my OH and daughter were totally delighted with it, and the mood the colours create so I am a happy crafter :D

Don't forget to hop over to the main blog to see what the rest of the uber talented DT have made to inspire you, you can get there HERE

Happy Crafting :D

Sandie xxx

Challenges:
Deep Ocean challenge - #100 Easter/Spring
Create and Inspire - #18 ag
Inspiration destination - 26 ag
Simply papercrafts - #1 ag
Creative Fingers - #73 ag
Scribble and scrap - #41 ag
613 Ave Create - #117 ag
Creatalicious challenge - #73 ag

Sunday, 18 January 2015

Its got to be Love!

Hello again,

I have a gorgeous image to share with you today for the start of the new challenge over at That Craft Place Challenge Blog and the theme is Love/Valentines

You know me, I'm not the mostly girly of girls but using a fabulous image is the best way to get into the mood, so I chose Keep A Secret Betty Boots by That Craft Place (Lisa is just amazing!)

Here she is:


I really loved the final look of this one...as some of you know I've not been feeling the best lately and even harder on myself than usual but this one did the trick and made me smile :D

Here's what and how:
Image: Keep a Secret, Betty Boots from That Craft Place Etsy Shop
Coloured: Copic colours are; for the skin E000, E00, E21, E11, E04 and for the hair E53, E53, E57 and E59, sorry the reds where experimenting with my new pens so I don't have the final colours.  She was printed and coloured on 300gsm super smooth card from That Craft Place
Additional items available from That Craft Place as follows:
Backing Paper: My Minds Eye paper pad, also used for insert
Dies: Spellbinders Adorning Squares
Burlap, flowers, ribbon, MDF shapes and Frantage (loooove Frantage!)
Small bottle filled with small gems for fairy dust, which is good for wishes as we all know!
And bells!  The bells were from a Christmas Decoration I picked up from the Range last week at 70% off and I off course chopped it up and its now in my lovely stash!

So, this is my Love make and the bells actually make a fabulous sound when you shake the card!

Here's the close ups:


Thank you so much for stopping by and I would love it if you would follow my crafty blog (buttons on the top of the right sidebar) xxx

Don't forget to hop over the the That Craft Place Challenge Blog to see what the rest of the uber talented design team have been up to!  I am so loving being on the DT with them xxx

Happy Crafting :D

Sandie xxx

Challenges:
Papertake weekly - It's all new (new copics and die)
Whoopsie daisy - January AG
Creative Inspirations - #296 AG
The sisterhood of crafters - AG with a twist (new stuff) (copics and dies)
Inspiration Destination - #16 AG
The Papershelter - #186 punches or dies
Fab'n'funky challenge - #242 what new (copics and dies)
Scrap and craft inspiration challenge - #1 AG
Suzy Bee's blooming challenge - #63 AG twist of sparkle; gems, and bottle of sparkle
Crafty Calendar Challenge - January, whats new; (copics and dies)

Sunday, 7 December 2014

And now....First DT piece for That Craft Place....

Hello again,

I am very excited today to share my very first DT piece for That Craft Place!  I was smiling from ear to ear when they asked me to join and may just have shrieked out loud to a room full of teenagers who were then laughing at me! But never mind all that.....I'm here to start off the challenge and the theme is Christmas which is good because my desk is full of holiday bits and pieces lol.

So, here we go!  Here is my make...


I'm loving the contrast between the rich green and the red!

Here's what I used to make it:
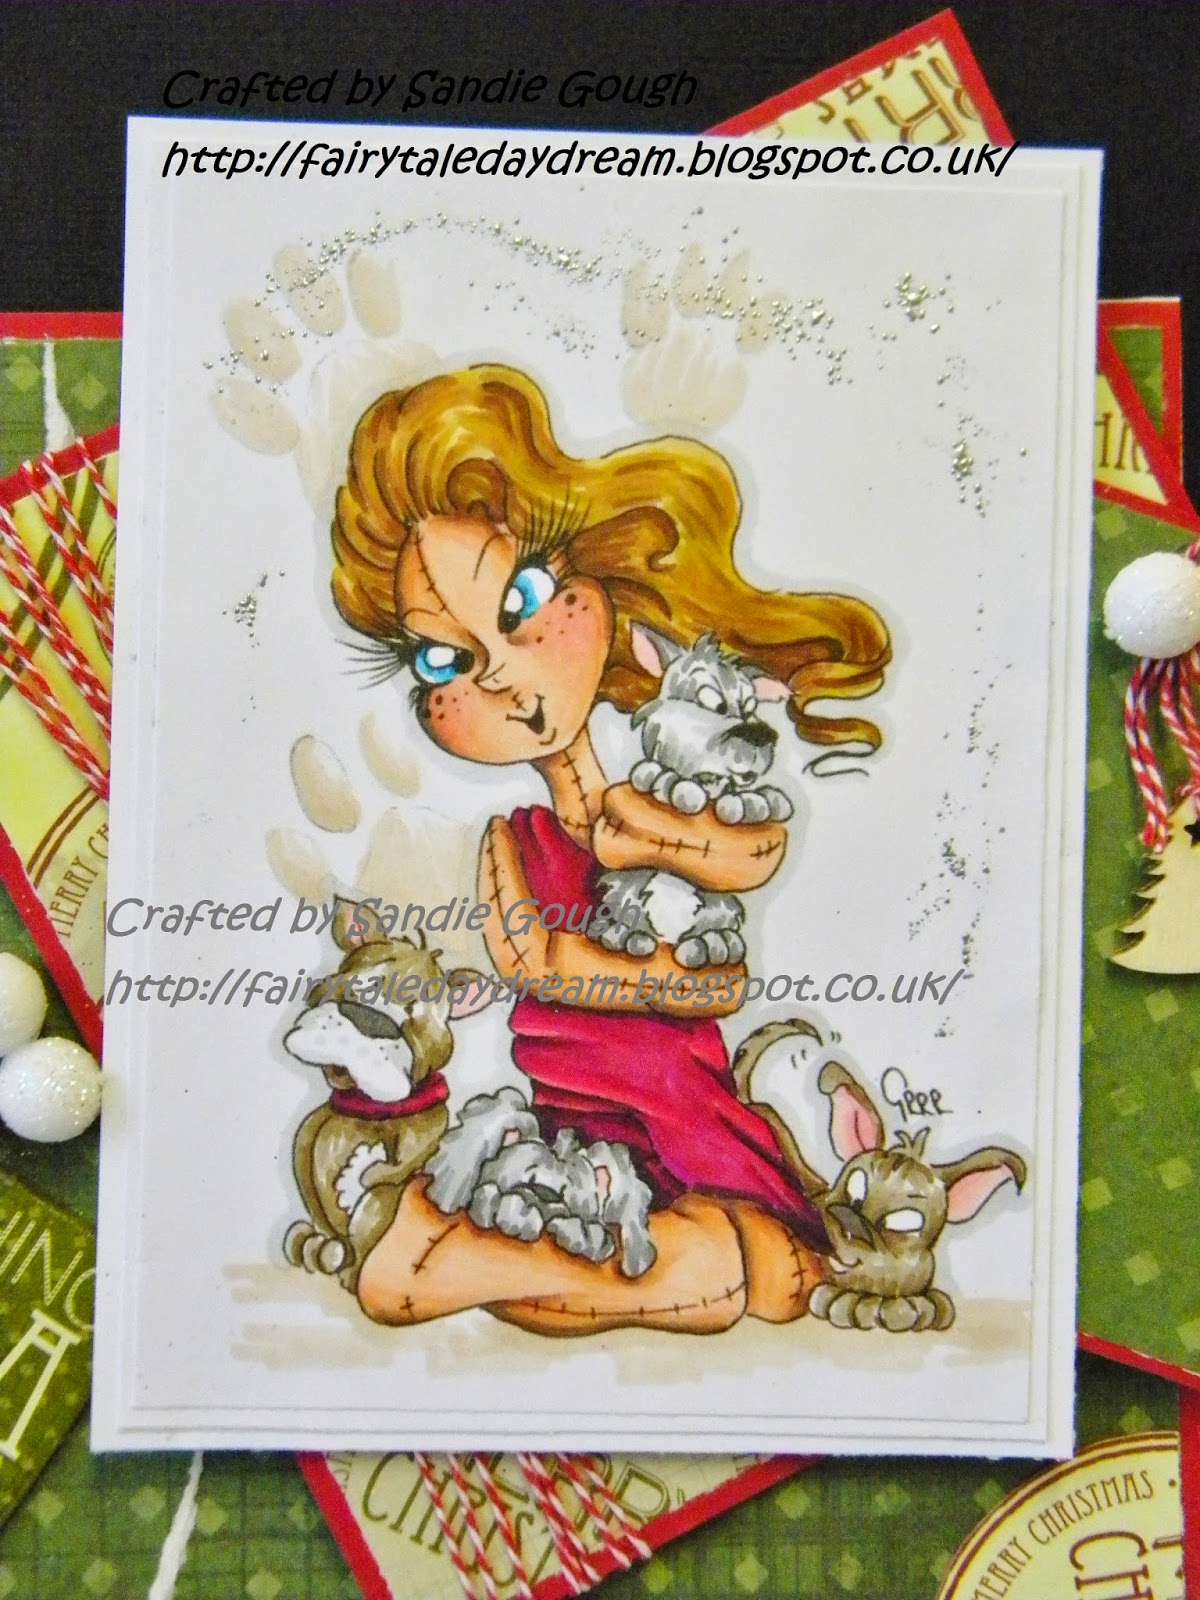
Image: Sugar's Doggie's by That Craft Place - and 50% of the profits of this one go to Manchester Dogs Home so a great reason to check it out and buy :D
The image is not 'technically' a Christmas image, but I like the idea of being able to use our digi stamps all year round and why not...I think she makes a great Christmas card for anyone who adore's their fury friends :D
Coloured: with my Graph'it Marker pens - my fav red combo of 5255, 5270, 5280, 6150 and a little 5210.  I loved flicking strokes on the little doggie's so much so I almost got carried away lol
Background: red card stock from my stash; DoCrafts Christmas paper from a few years ago that I had in my stash BUT check out the new range at That Craft Place
Embellies: All from my stash of goodies; a huge range of embellies and MDF/greyboard shapes big and small can be found at That Craft Place

Here's how:
Nothing special on this one, as I decided to keep it simple (sometimes the most effective!).  I cut an 8"x 8" card blank down to 7" x 7" so that I could hang over the edges and not have to make a box!  A great tip especially if posting, it gives dimension out but not up!
I made the insert with backing papers and layering white card on top to write the greeting, an effective way to get the inside to match.
The image is printed on 300gsm super smooth card stock from That Craft Place and I would not use any other now, the blending is totally awesome on it :D  I have double layered the image onto plain white card stock so that the focus remains on the image.

Here's the close ups:


There you go...my very first DT inspiration for That Craft Place Challenge Blog and I hope you can hop over to the main blog and see the rest of the teams makes...then join us for the Christmas challenge.
Useful links for this make:
That Craft Place - shop full of lush crafting goodies
http://thatcraftplaceblog.blogspot.co.uk/ - Challenge Blog 
https://www.facebook.com/groups/271008489659989/ TCP Facebook Shop!
https://www.facebook.com/groups/184329015068367/ TCP Natter & Chatter 

Thank you for taking the time to stop by and I hope you will follow my blog for my upcoming crafty adventures :D

Happy Crafting :D

Sandie xx

Challenges:
Papertake weekly - AG 2/12
The Pink Elephant challenge - 279 photo inspiration - home and a mans best friend x
Penny's papercrafty challenge - 206 fav colours, its got to be red and green
A Random Fan - 20 Christmas
Word Art Wednesday - 161 AG
Crafting for all Seasons - 91 Tis the season
Inspiration Destination - 10 AG
Treasured Times Rubber Stamps - 30 AG
A Gem of a Challenge - 134 AG