Hello there,
A quick pop in today to share an MDF make that one of our twin's, Zoe, built covered and sealed herself.
Zoe (almost 16! how did that happen!) has just set off for her 2nd residential as a part of the National Citizenship Service, which is a fabulous opportunity for her and we are so proud that she grabbed the chance to so it. BUT she was away all last week on an outward bounds adventure, home for the weekend and she's off again till Friday! One week was bad enough for a Mummy, let alone 2! I'm sure many of you will know exactly how I feel lol But at least she has wi-fi and a signal this week so I can stalk her and make sure she isn't being eaten by some big monster or other irrational invention of the Mummy brain!
So, back to her make...a while ago I ordered one of the totally gorgeous MDF Remote/Phone holders from That Craft Place and gave it to Zoe to make as a way of getting her to relax during her exams. She loves altered art and transforming stuff so these MDF makes are just the right thing for her. Lisa Horton designs the most amazing laser cut projects that are such high quality and fit together so well that once you buy one, trust me you are hooked!
Here is what Zoe did with it....
Everything she used is available at That Craft Place who you really must check out. Their web address for the bricks and mortor shop is www.thatcraftplace.co.uk
Materials:
My Minds Eye Chalkboard 12x12 paper pad, MDF laser cut Remote/Phone Holder, Black Gesso, Paint brush, Matt Medium and Gloss Medium by decoart - that's it apart from scissors!
To make it, she thought ahead (which I have got to say never occured to me lol) and drew around the MDF parts on scrap paper BEFORE she put it together and painted it black! There's a top TIP, as she then had a template for the papers she used to cover it! doh! One of the many many reasons I love her so much lol
Another TOP TIP (mine this time lol) was to make sure she sanded the edges of the paper at a 45 degree angle to finish the paper edges. This doesn't only make it look better and adds a little distressed effect but it also helps the paper bond to the MDF and completes the seal (reduces peeling later).
Here's some more pics:
Thank you so much for stopping by and taking a peek at Zoe's project and if you would like to leave her a comment she would love to hear your thoughts :D
Crafty Hugs
Sandie and Zoe xxx
Challenges entered on Zoe's behalf:
http://lilpatchofcraftyfriends.blogspot.co.uk/ 14
http://a-step-in-the-darkness.blogspot.co.uk/ 25
http://inspirationdestinationchallengeblog.blogspot.co.uk/2015/07/AG-no-42.html 42
http://simplypapercraftsforalloccassions.blogspot.co.uk/ 9
http://creativefingerschallengeblog.blogspot.co.uk/ 87
http://craftyhazelnutspatternedpaper.blogspot.co.uk/ July
Showing posts with label Altered Art. Show all posts
Monday, 20 July 2015
MDF transformed by our Zoe :D
Labels:
Altered Art
,
Decoarts
,
distress
,
Gloss Medium
,
Lisa Horton
,
Matt Medium
,
MDF shapes
,
My Minds Eye
,
Sanding
,
That Craft Place
,
Zoe Gough
Saturday, 2 May 2015
You won't want to miss the Weekender on Create and Craft!
Hello again,
A super quick post from me this morning (I am actually here, not scheduling this! strange feeling for me lol).....I wanted to share the great offers in the Create and Craft half price shows this weekend!
News I have been meaning to share, but was so busy making 3 different lots of samples (oooh secrets lol) that I still happy dancing around my craft space about is....I was asked to join the Crafters Companion Di'sire design team! AWESOME! All that hard work (shhh my family think I was working hard not playing at my craft desk lol) and growing in my crafting has brought me to this amazing group of crafters on the team....its so fabulous :D
The Weekender Deal is an amazing set of templates from Crafters Companion at an amazing price!
Check out the shows to see more, with the lovely Fiona demo'ing....
Oh, and you will catch some of my samples too! Like this one....
To see how you put this easy to use template together, catch the show's on Create and Craft on all over the weekend with Fiona from Crafters Companion
I will show you more of my samples from these delicious templates soon :D
Thanks for stopping by and make sure you follow me so you don't miss more of the designs xxx
Happy Crafting
Sandie xxx
Challenges:
http://craftingfromtheheartchallengeblog.blogspot.co.uk/ 57 ag
http://thepinkelephantchallenge.blogspot.co.uk/ 296 ag
http://pennyschallenges.blogspot.co.uk/ 225 anything but square!
http://fattastictuesday.blogspot.nl/ 83 use twine
http://ema-ginationstation.blogspot.co.uk/2015/04/AG-no-31.html 31 ag
http://scrap-craft-inspiration.blogspot.co.uk/2015/04/scrap-craft-7-tie-it-up-use-ribbon-or.html 7
http://simplypapercraftsforalloccassions.blogspot.co.uk/ 3 ag
http://craftycatzweeklychallenge.blogspot.ca/ colour challenge
http://creataliciouschallenges.blogspot.co.uk/ 74 embossing (basket)
A super quick post from me this morning (I am actually here, not scheduling this! strange feeling for me lol).....I wanted to share the great offers in the Create and Craft half price shows this weekend!
News I have been meaning to share, but was so busy making 3 different lots of samples (oooh secrets lol) that I still happy dancing around my craft space about is....I was asked to join the Crafters Companion Di'sire design team! AWESOME! All that hard work (shhh my family think I was working hard not playing at my craft desk lol) and growing in my crafting has brought me to this amazing group of crafters on the team....its so fabulous :D
The Weekender Deal is an amazing set of templates from Crafters Companion at an amazing price!
Check out the shows to see more, with the lovely Fiona demo'ing....
Oh, and you will catch some of my samples too! Like this one....
![]() |
| Using the Hot Air Balloon gift box template |
To see how you put this easy to use template together, catch the show's on Create and Craft on all over the weekend with Fiona from Crafters Companion
I will show you more of my samples from these delicious templates soon :D
Thanks for stopping by and make sure you follow me so you don't miss more of the designs xxx
Happy Crafting
Sandie xxx
Challenges:
http://craftingfromtheheartchallengeblog.blogspot.co.uk/ 57 ag
http://thepinkelephantchallenge.blogspot.co.uk/ 296 ag
http://pennyschallenges.blogspot.co.uk/ 225 anything but square!
http://fattastictuesday.blogspot.nl/ 83 use twine
http://ema-ginationstation.blogspot.co.uk/2015/04/AG-no-31.html 31 ag
http://scrap-craft-inspiration.blogspot.co.uk/2015/04/scrap-craft-7-tie-it-up-use-ribbon-or.html 7
http://simplypapercraftsforalloccassions.blogspot.co.uk/ 3 ag
http://craftycatzweeklychallenge.blogspot.ca/ colour challenge
http://creataliciouschallenges.blogspot.co.uk/ 74 embossing (basket)
Labels:
Acrylic paint
,
Altered Art
,
balloon
,
coordinations
,
Crafters Compainion
,
distress
,
gift
,
string
,
Templates
Sunday, 26 April 2015
Anything But A Card over at That Craft Place...
Hello again,
Over at That Craft Place Challenge the theme this fortnight is No Cards! A theme that used to fill me with dread, but I think the uber talent of my design team must be rubbing off coz I don't shake anymore...I just panic a little lol
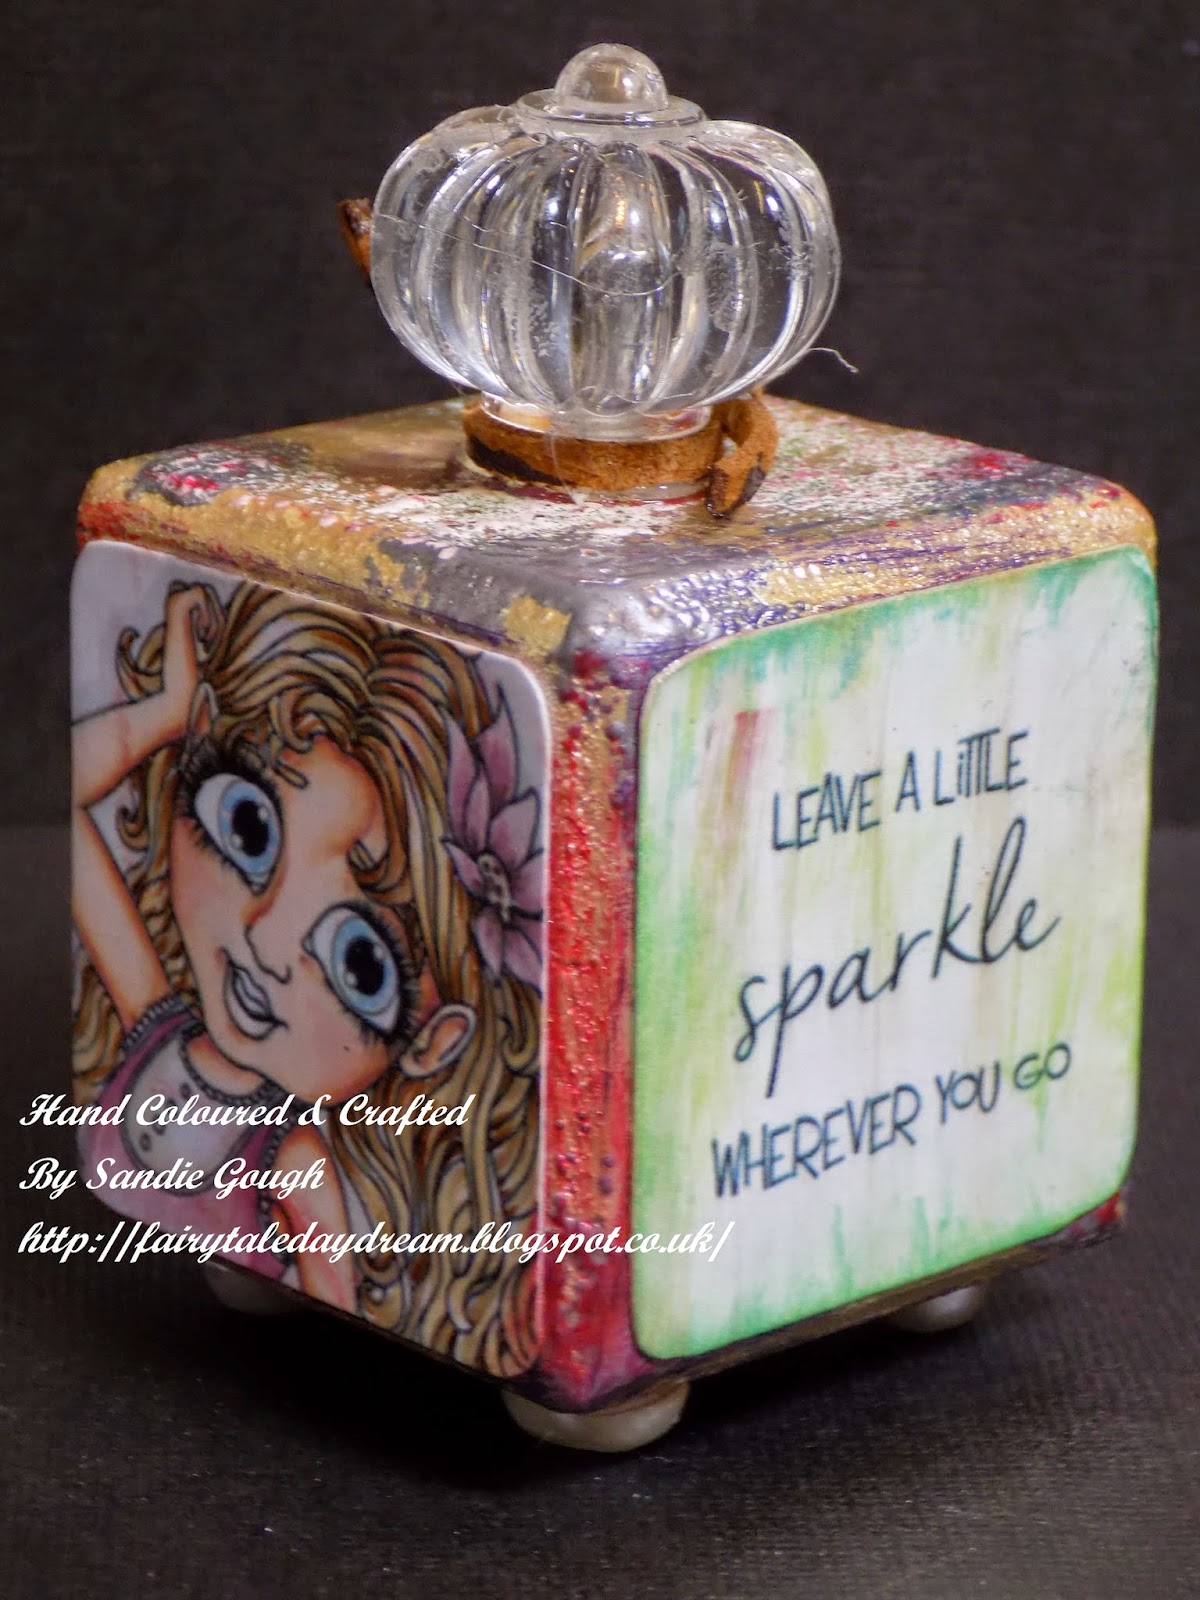
So here it is, my design team inspiration for No Cards!
I was super pleased with how this came out I can tell you and it is actually one of the samples I made for the Creative Expressions Stamp Launch at Stitches Trade Show earlier in the year but wasn't allowed to share at the time.
There are 8 Creative Expressions Betty Stamp Sets to choose from and ALL are available at That Craft Place (or any Creative Expressions stockist).
Don't forget that other Betty Stamps can be found at That Craft Place Etsy Shop in digital format along with the fabulous Sugar and Spice digital stamps.
Here's the what's for this one:
The base is a wooden block (mine measured 2" square and was one letter in a LOVE block set I had for years, possibly from Dunhelms lol) but its the size of a toddlers block so any block will work.
The block is painted with Pinflair Buff it, watered down a little and painted on, and then I melted Metal Magic and Shabby Green Frantage on the corners and down some of the edges. Really there is no rules to this, just make it different!
I coloured 3 of the stamps up with Copics and stamped one of the sentiments. All were cut down to a little under 2" square and I rounded the corners with scissors as it was too small for a corner punch.
I used gloss medium to stick them on (its super sticky) and the stuck a cheap plastic draw knob to the top and flat backed pearls to the bottom for feet!
Add a little cord to the top and then gloss the whole thing to seal the colours and paper together, it also makes the colours pop!
All the supplies used can be found at That Craft Place FB group or from their actual shop shop which can be found via the new gorgeous Website.... http://www.thatcraftplace.co.uk/
Here's a couple more pics...
I was so honoured to work with Lisa Ditzie Horton on the launch samples for the Creative Expressions Betty Stamp sets launch along with the design team and I will share some more of my samples soon :D
That Craft Place Challenge starts now and so get your thinking caps on and enter the No Cards challenge.
Happy Crafting :D
Sandie xxx
Challenges:
http://toptiptuesday.blogspot.co.uk/ three images
http://www.addictedtostamps-challenge.blogspot.com.au/ 141 ag
http://ema-ginationstation.blogspot.co.uk/2015/04/AG-30.html 30 ag
http://artbymiranchallenge.blogspot.co.uk/ 30 ag
http://avenue613.blogspot.co.uk/ 121 ag
http://buckwellscraftychallenge.blogspot.co.uk/2015/04/buckwells-crafty-challenge-colour.html April colour palette in my images
Over at That Craft Place Challenge the theme this fortnight is No Cards! A theme that used to fill me with dread, but I think the uber talent of my design team must be rubbing off coz I don't shake anymore...I just panic a little lol
So here it is, my design team inspiration for No Cards!
| I used 3 of the Creative Expressions Betty Stamp Sets to make this altered cube into a paperweight! |
| One sentiment from the stamp sets... |
| Pic shows the base of the paperweight! |
There are 8 Creative Expressions Betty Stamp Sets to choose from and ALL are available at That Craft Place (or any Creative Expressions stockist).
Don't forget that other Betty Stamps can be found at That Craft Place Etsy Shop in digital format along with the fabulous Sugar and Spice digital stamps.
Here's the what's for this one:
The base is a wooden block (mine measured 2" square and was one letter in a LOVE block set I had for years, possibly from Dunhelms lol) but its the size of a toddlers block so any block will work.
The block is painted with Pinflair Buff it, watered down a little and painted on, and then I melted Metal Magic and Shabby Green Frantage on the corners and down some of the edges. Really there is no rules to this, just make it different!
I coloured 3 of the stamps up with Copics and stamped one of the sentiments. All were cut down to a little under 2" square and I rounded the corners with scissors as it was too small for a corner punch.
I used gloss medium to stick them on (its super sticky) and the stuck a cheap plastic draw knob to the top and flat backed pearls to the bottom for feet!
Add a little cord to the top and then gloss the whole thing to seal the colours and paper together, it also makes the colours pop!
All the supplies used can be found at That Craft Place FB group or from their actual shop shop which can be found via the new gorgeous Website.... http://www.thatcraftplace.co.uk/
Here's a couple more pics...
I was so honoured to work with Lisa Ditzie Horton on the launch samples for the Creative Expressions Betty Stamp sets launch along with the design team and I will share some more of my samples soon :D
That Craft Place Challenge starts now and so get your thinking caps on and enter the No Cards challenge.
Happy Crafting :D
Sandie xxx
Challenges:
http://toptiptuesday.blogspot.co.uk/ three images
http://www.addictedtostamps-challenge.blogspot.com.au/ 141 ag
http://ema-ginationstation.blogspot.co.uk/2015/04/AG-30.html 30 ag
http://artbymiranchallenge.blogspot.co.uk/ 30 ag
http://avenue613.blogspot.co.uk/ 121 ag
http://buckwellscraftychallenge.blogspot.co.uk/2015/04/buckwells-crafty-challenge-colour.html April colour palette in my images
Sunday, 12 April 2015
Alter It...a challenge best tackled by two!
Hello again,
A word of warning - this is a picture heavy post, even for me! lol
It's a new challenge at That Craft Place Challenge Blog and the theme is 'Alter It', not really in my comfort zone so this looked like the perfect challenge to get reinforcements...in the shape of our youngest daughter, Tilly Jayne :D
Now Tilly is 7yrs old and when I tell you that the only bit's I did for her was to cut the paper at the beginning and hot glue the pearl string, you will understand my amazement and I've got to say a tiny bit of jealousy too! Just how crafty is she going to be!
Well....here goes!
Our pen pot/desk tidy tutorial (Tilly was so excited when I told her we were going to do a tutorial, it was so cute!)...
Proud and jealous Mummy day :D
All supplies, apart from the Pringles (although if you ask nicely Lisa might get you some lol) are available at That Craft Place. Stocks of flowers and lace do change with the times but Lisa is always crammed to the rafters with lushous goodies so you will be able to fill ya boots :D
Don't forget to check out the main blog to see what my uber talented teamies have made and to enter the challenge...just click...
That Craft Place Challenge Blog
Happy Crafting :D
Sandie xxx
Challenges:
A word of warning - this is a picture heavy post, even for me! lol
It's a new challenge at That Craft Place Challenge Blog and the theme is 'Alter It', not really in my comfort zone so this looked like the perfect challenge to get reinforcements...in the shape of our youngest daughter, Tilly Jayne :D
Now Tilly is 7yrs old and when I tell you that the only bit's I did for her was to cut the paper at the beginning and hot glue the pearl string, you will understand my amazement and I've got to say a tiny bit of jealousy too! Just how crafty is she going to be!
Well....here goes!
Our pen pot/desk tidy tutorial (Tilly was so excited when I told her we were going to do a tutorial, it was so cute!)...
| 1. Use a Pringles tin (empty of course) and cut on a diagonal approx 13 cms from the base (at the highest point) |
You will need 2 coordinating papers, one 12x12. Cut a strip from the 12x12 paper measured to your highest point (so in ours, it was 13cms). If you have double sided paper your good to go, but as we didn't we added a strip both ends at 5cms wide to make the ends double sided.
| 2. Cut the coordinating paper to fit the front (lowest point) of your tin at approx 10cms wide |
Glue in place and cut off the excess.
| 3. Cut the front to approx 1cm above the curve of your tin and then cut down 1cm and feather the edges (see pic), then stick the feathered bits down. |
The 7yr old face-bombing at this point is optional but hey, go with it! lol
| 5. Wrap and glue the other half (they will overlap at the back but this adds strength) and trim to 1cm above the top, and once again cut down, feathering the edge, then push over and glue. |
You can see why no glue on the ends in these two pics....
| 6. Use a pencil or small paint brush to roll back the two ends at the front, revealing the 2nd paper underneath |
| 7. Line inside with old book pages, we used a thesaurus that has been used for so many things lol |
The decorate to your hearts content!
I love the rolled back front because it gives a focal point, but also gives a lot of possible looks using embellishments, so you'll want to make it again :D
Right...enough waffling, now you can join my pain and guess which one is mine!
| Right image: Is mine....Left image: is Tilly's Wow right! or left in this case! |
Here's a couple more pic's if you can take it...scroll past if you've had enough pics lol but I wanted to showcase the work as I promised I would, she is going to be so happy when this post is seen :D
| Remember, this one is mine, the pink one above left is Tilly's! |
Proud and jealous Mummy day :D
All supplies, apart from the Pringles (although if you ask nicely Lisa might get you some lol) are available at That Craft Place. Stocks of flowers and lace do change with the times but Lisa is always crammed to the rafters with lushous goodies so you will be able to fill ya boots :D
Don't forget to check out the main blog to see what my uber talented teamies have made and to enter the challenge...just click...
That Craft Place Challenge Blog
Happy Crafting :D
Sandie xxx
Challenges:
Open Minded Crafting fun - 34 recycled
Allsorts Challenge - 306 bingo; lace, flowers, pearls
Wednesday wordart - 178 ag
Inspiration Destination - 28 ag
Crafty Catz weekly - 274 2 or more patterned papers
Crafty Hazlenuts Patterned paper challenge April
Creatalicious - 73 ag
Sisters of Craft - April ag
Allsorts Challenge - 306 bingo; lace, flowers, pearls
Wednesday wordart - 178 ag
Inspiration Destination - 28 ag
Crafty Catz weekly - 274 2 or more patterned papers
Crafty Hazlenuts Patterned paper challenge April
Creatalicious - 73 ag
Sisters of Craft - April ag
Labels:
Altered Art
,
American Crafts
,
Bling
,
Copic's
,
Desk tidy
,
Flowers
,
Graphic 45
,
Hot glue
,
Lace
,
make
,
pen holder
,
Ribbon
,
Sandie Gough
,
That Craft Place
,
Tilly Jayne
Sunday, 29 March 2015
Altered Heart for Easter...
Hello Again,
Well it's challenge time again over at That Craft Place Challenge Blog and this one had me a little flummoxed! The theme is Easter or Spring.... but naughty Erin added the Spring after I had spent an age trying to come up with an Easter project as I don't make Easter cards! But I'll get her back later and go back to telling you about my Easter make lol
So, Easter really does mean different things to different people, faiths and cultures and even between members of my family, so I decided to go with the more religious side as my OH and youngest daughter would love it and sometimes the rest of us forget that!
As I was way outside my comfort zone already, I decided to go for a mixed media make and really hang myself out there! So here is my make incorporating The Cross on the hill...
Here's the how's - but I thought I'd add my first ever blogland tutorial...
MATERIALS: Everything I used to make this can be purchased from the wonderful Lisa Horton at That Craft Place. I will add the products used under each picture, so you know when I used them :D
I really enjoyed this and my OH and daughter were totally delighted with it, and the mood the colours create so I am a happy crafter :D
Don't forget to hop over to the main blog to see what the rest of the uber talented DT have made to inspire you, you can get there HERE
Happy Crafting :D
Sandie xxx
Challenges:
Deep Ocean challenge - #100 Easter/Spring
Create and Inspire - #18 ag
Inspiration destination - 26 ag
Simply papercrafts - #1 ag
Creative Fingers - #73 ag
Scribble and scrap - #41 ag
613 Ave Create - #117 ag
Creatalicious challenge - #73 ag
Well it's challenge time again over at That Craft Place Challenge Blog and this one had me a little flummoxed! The theme is Easter or Spring.... but naughty Erin added the Spring after I had spent an age trying to come up with an Easter project as I don't make Easter cards! But I'll get her back later and go back to telling you about my Easter make lol
So, Easter really does mean different things to different people, faiths and cultures and even between members of my family, so I decided to go with the more religious side as my OH and youngest daughter would love it and sometimes the rest of us forget that!
As I was way outside my comfort zone already, I decided to go for a mixed media make and really hang myself out there! So here is my make incorporating The Cross on the hill...
| Handmade twisted wire Cross, altered with paint and Pinflare Buff It |
| Front View |
| Side view to show the 3D effects |
MATERIALS: Everything I used to make this can be purchased from the wonderful Lisa Horton at That Craft Place. I will add the products used under each picture, so you know when I used them :D
| Now the fun bits....after putting another covering of Gesso to everything, I then painted the 'hill' in metallic green liquid acrylic paint |
| I then added red acrylic, toned down with brown acrylic to the whole piece. Again, it was dry brushed so not to add too much and so it also picks up the texture of the materials. |
| This pic of the finished piece shows the Buff It a little better, just touches that pic up the light. |
| And there you have it... |
Don't forget to hop over to the main blog to see what the rest of the uber talented DT have made to inspire you, you can get there HERE
Happy Crafting :D
Sandie xxx
Challenges:
Deep Ocean challenge - #100 Easter/Spring
Create and Inspire - #18 ag
Inspiration destination - 26 ag
Simply papercrafts - #1 ag
Creative Fingers - #73 ag
Scribble and scrap - #41 ag
613 Ave Create - #117 ag
Creatalicious challenge - #73 ag
Labels:
Acrylic paint
,
Altered Art
,
Cosmic Shimmer
,
Cross
,
Easter
,
Liquid Acrylic
,
MDF shapes
,
Mixed Media
,
Pinflair Buff It
,
That Craft Place
,
Wire
Sunday, 1 March 2015
Betty Boot's New Release...number 1!
Hello again,
Wow! What a new release for our Betty Boots! You must must must check out That Craft Place Etsy Shop to see all the gorgeousness but we also have showcase posts by the design team to show off all the new designs. This is the first of two showcase posts (but I am showing off two more designs with my challenge posts today to keep you busy! So four, yes 4, post from me today! phew!
So, on with number 1...
Isn't she just lush!
Here's the what and hows:
Image: New release, Whisper Betty from the Betty Boots collection from That Craft Place Etsy shop, also available at these links:
That Craft Place - shop full of lush crafting goodies
http://thatcraftplaceblog.blogspot.co.uk/ - Challenge Blog
https://www.facebook.com/groups/271008489659989/ TCP Facebook Shop!
https://www.facebook.com/groups/184329015068367/ TCP Natter & and Chatter FB group
Other stuff!:
The backing is primed canvas, I drew around the heart and then cut and trimmed to size. I coloured the background with Brusho paints by wetting the canvas and then sprinkling the Brusho powder in tiny amounts onto the wet canvas. The colour spreads and mixes to give a vibrant backing.
The canvas is adhered using gloss medium (from That Craft Place) and then I stamped Betty Boots in black Archival ink.
I then adhered Whisper Betty using the same gloss medium (lazy lol) and then coated the whole thing with the gloss medium. The edges are covered in Cosmic Shimmer gilding wax and then also covered in the medium. I did put on two coats to protect it.
The flowers are die cut from old book pages and then covered in Cosmic Shimmer mica powders after soaking them first! Dried using the heat gun (no patience lol) and then I added rolled paper flowers to the centre. The pearl finished off the flowers.
The heart and the butterfly are punched from the left over canvas after cutting out the heart (hate waste lol)) and then layered up to give them dimension.
Final touches of pins and charms and there you go :D
Here's the close ups:
Thank you so much for stopping by and please don't forget to check out the main blog for the rest of the teams new release makes, they really are uber talented :D
Here's the links again:
Don't forget...this is 1 of 4 posts today! Press home and then scroll down and up to check out the others :D
Happy Crafting :D
Sandie xxx
Challenges:
Lil patch of crafty friends - #5AG
Glitter and Sparkle - #126 AG
Not Just Cards - #13 AG
Tuesday Throwdown #233 AG
Inspiration destination - #22 AG
Creative Fingers - #69 AG
Scribble and Scrap - #39 AG
613 Ave Create - #113 AG
Wow! What a new release for our Betty Boots! You must must must check out That Craft Place Etsy Shop to see all the gorgeousness but we also have showcase posts by the design team to show off all the new designs. This is the first of two showcase posts (but I am showing off two more designs with my challenge posts today to keep you busy! So four, yes 4, post from me today! phew!
So, on with number 1...
| Whisper Betty mounted onto a paper mache heart with fridge magnet attached |
| Fussy cut with a border to add definition between Betty and the background |
Isn't she just lush!
Here's the what and hows:
Image: New release, Whisper Betty from the Betty Boots collection from That Craft Place Etsy shop, also available at these links:
That Craft Place - shop full of lush crafting goodies
http://thatcraftplaceblog.blogspot.co.uk/ - Challenge Blog
https://www.facebook.com/groups/271008489659989/ TCP Facebook Shop!
https://www.facebook.com/groups/184329015068367/ TCP Natter & and Chatter FB group
Other stuff!:
The backing is primed canvas, I drew around the heart and then cut and trimmed to size. I coloured the background with Brusho paints by wetting the canvas and then sprinkling the Brusho powder in tiny amounts onto the wet canvas. The colour spreads and mixes to give a vibrant backing.
The canvas is adhered using gloss medium (from That Craft Place) and then I stamped Betty Boots in black Archival ink.
I then adhered Whisper Betty using the same gloss medium (lazy lol) and then coated the whole thing with the gloss medium. The edges are covered in Cosmic Shimmer gilding wax and then also covered in the medium. I did put on two coats to protect it.
The flowers are die cut from old book pages and then covered in Cosmic Shimmer mica powders after soaking them first! Dried using the heat gun (no patience lol) and then I added rolled paper flowers to the centre. The pearl finished off the flowers.
The heart and the butterfly are punched from the left over canvas after cutting out the heart (hate waste lol)) and then layered up to give them dimension.
Final touches of pins and charms and there you go :D
Here's the close ups:
| The layers of the butterfly really show the texture of the canvas, its why I chose to use it |
| Great pic to show the texture |
| Once placed the flowers, hear and butterfly were also sealed with the Gloss Medium |
| Brusho's give such a vibrancy |
| Whisper Betty |
| I left the brush strokes when sealing with the Gloss Medium to add texture, and its quicker lol |
| They will kill me but here it is on the fridge! The pic is of my twins, about 3 yrs ago!!! They're 15 now lol |
Here's the links again:
That Craft Place Challenge Blog
Happy Crafting :D
Sandie xxx
Challenges:
Lil patch of crafty friends - #5AG
Glitter and Sparkle - #126 AG
Not Just Cards - #13 AG
Tuesday Throwdown #233 AG
Inspiration destination - #22 AG
Creative Fingers - #69 AG
Scribble and Scrap - #39 AG
613 Ave Create - #113 AG
Labels:
Altered Art
,
Betty Boots
,
Butterflies
,
Canvas
,
Copic's
,
Flowers
,
Gloss Medium
,
Hearts
,
Magnet
,
Mixed Media
,
Sugar and Spice
,
That Craft Place
Subscribe to:
Posts
(
Atom
)