Monday 29 December 2014

Last Christmas commission to share...then its New Year!

Hello again,

Another commission make I'd like to share with you based on a card I did a while back.  The simple style was chosen by a friend who asked me to a make a special Christmas card for someone special, so I'd like to share it with you now I can.

This is another short post as we are all so very busy with family at this time of year that I don't want to keep you too long xxx

Here it is:


No digi stamp, just the sentiment and the added name...I think it turned out so effective that I will be doing more similar in future :D
The sentiment is double layered on white card, a technique I've shared before with you that works so well to lift the image without taking the eye away from it.  I added a touch of blue guilding wax by Cosmic Shimmer to the edges (its one of Phil Martins colours)
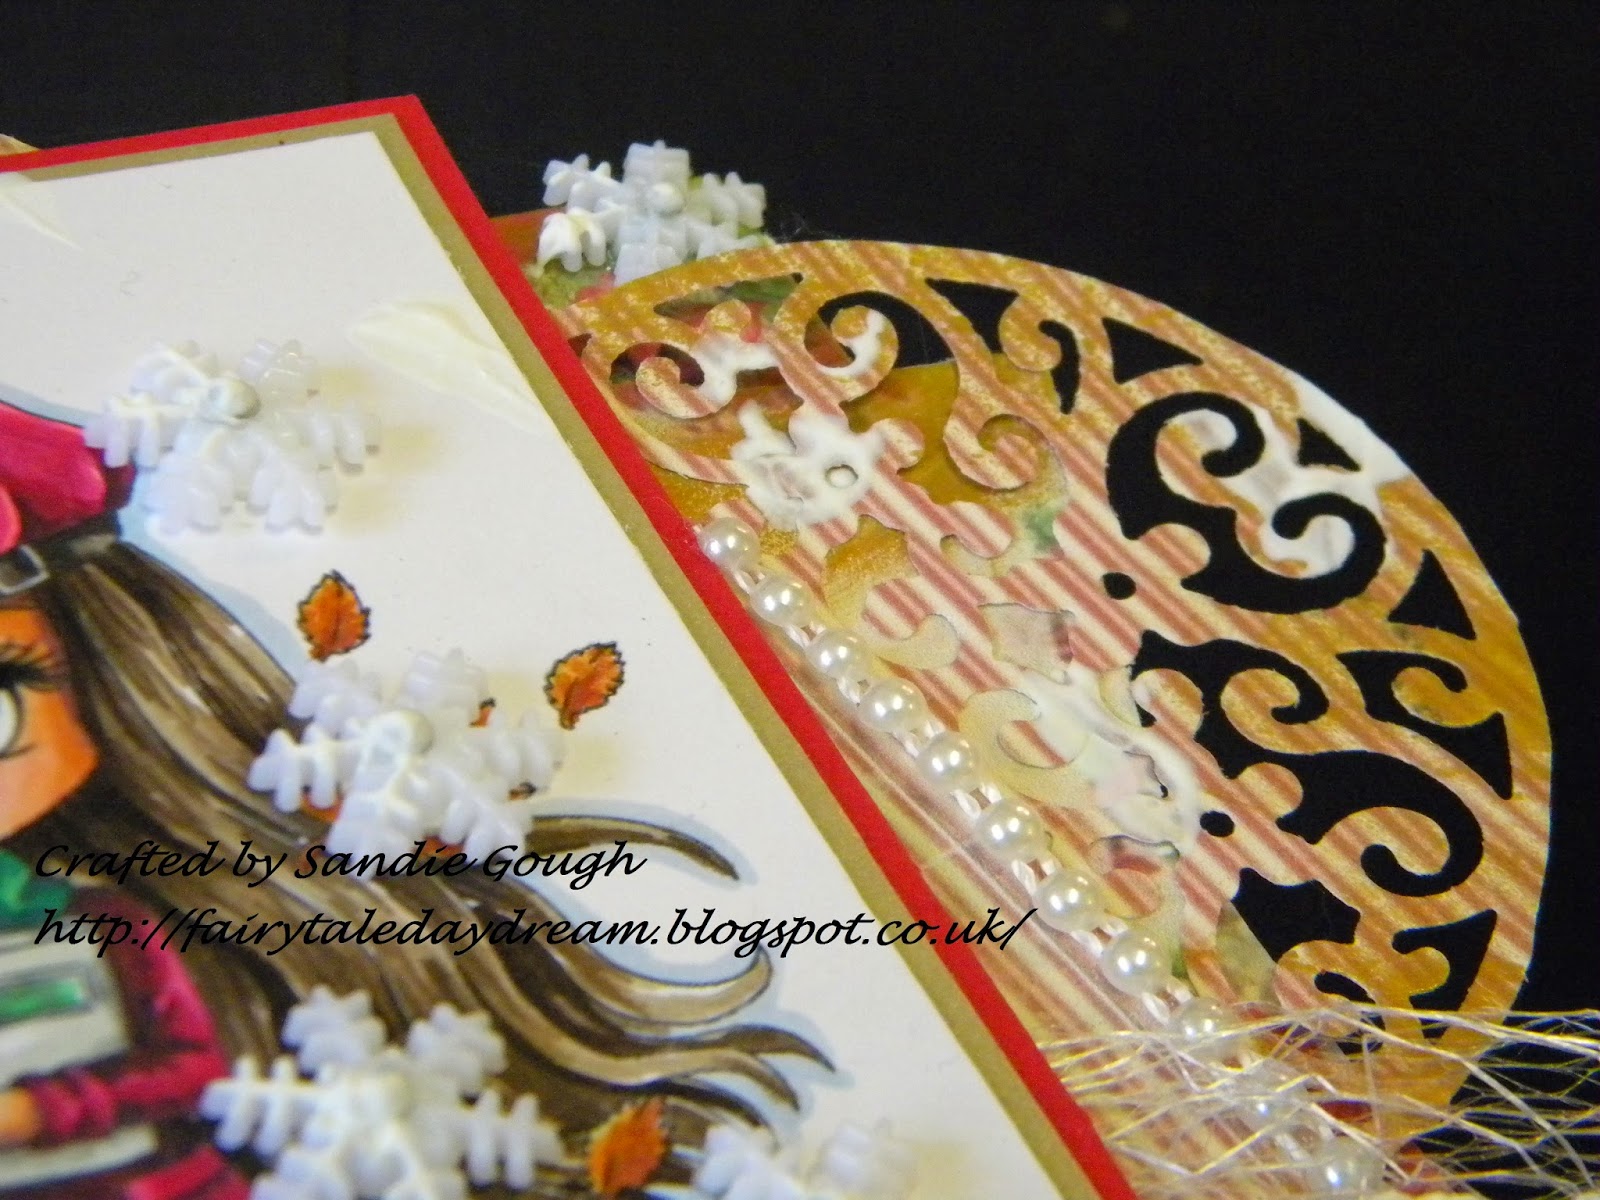
The backing papers are from Michele R Designs as is the insert
The snowflakes are cut on my sillouette
The bling, flowers, charms, white gesso, pearls and other embellies are from That Craft Place
Top Tip: the voile edging is again pleated using my hot glue gun, one pleat at a time!  So much quicker than sewing (which I can't lol) and a new tip is that I use my large embossing tool (large ball on the end) to push the voile into the hot glue!  Keeps my fingers away and the glue comes off the metal ball end so easily its a great trick xx

Here's the close ups:


Thank you so much for stopping by I really do appreciate you taking the time xxx

Happy Crafting and a Happy New Year to you and yours

Sandie xxx

Challenges:
Glitter and Sparkle - 117 AG
Loves Rubber Stamps - 131 Holiday blitz AG; digi stamp sentiment and paper
Word Art Wednesday - 163 AG
Creative Knockout - 69 ag
Brown Sugar Challenge - 126 Happy New Year
Creative Fingers - AG
CCC Digi Creations - 15 Digi and Rhinestones or ribbon
Get Creative - 4 Blue and white
613 Ave Create - 104 AG
Just Inspirational Challenge - Christmas

Sunday 28 December 2014

A present I can now share...The perfect image by Saturated Canary

Hello again,

Another post Christmas share from me today...and a much shorted write up you'll be pleased to know lol

This one was a Christmas present for my step-daughter as she has recently moved to a whole new town, new job, miles away to move in with her fabulous girlfriend Rachel.

We are so proud of them both that I wanted to make something special for their first home together.

The totally awesome Krista from Saturated Canary then posted a new image called Freedom and that was it...totally perfect :D

I coloured her with my Graph'it Markers, cut her square on white 300gsm super smooth paper (from That Craft Place) and then put her in a 15x15 cm box frame.

The box frame gave me the room to add the 'junk' as I like to call it from my stash.  Flowers, lace, pearls, well you'll see in the pics.

I added the name of the image by hand as I wanted them to know it was from the heart and that was it xx

Here's the pics...


Thank you so much for stopping by at this busy time of year and crafty hugs to you xx

Happy Crafting :D

Sandie xxx

Challenges:
Penny's paper crafty challenge - 208 AG
Scrappers Delights - 37 AG
Imagination Destination - 13 AG
The Paper Shelter - Christmas challenge AG
Creative Knockouts - 69 ag
Art by MiRan - 22 AG
Hiding in my Craftroom - 180 Freestyle no Christmas
Allsorts Challenge - 290/291 last minute gifts
Scribble and Scrap - 34 AG
613 Avenue Create - 104 AG

Saturday 27 December 2014

A Christmas commission...couldn't show it before...

Hello and I hope you all had a fabulous Christmas Day full of joy and smiles xxx

Just a quick stop by today to share with you a commission make with you that I couldn't share before Christmas.  As I'm sure many of you did, I had a lot of commission makes and won't be blogging them all (phew I here you cry lol) but I thought I'd share a couple.

So here's the first one....


You know that feeling when you stand back and look at your finished work and smile to yourself...this was one of those!  I love it and had a hard time handing it over lol

A quick bit on what and how:
Image - Autumn's Memoires by Art by MiRan; technically for Autumn but I adore this image so I used snowflakes from my stash to cover some of the leaves and I think it worked quite well...and here in England the leaves are still falling so the weather agree's lol
I coloured with my Graph'it Marker pens (Santa might be bringing me Copic's eeek) and matted and layered the image on gold and red.
The backing papers, little envelopes and insert are all from Michele R Designs and the die cut sides are actually from an envelope element that I enlarged before printing and then die cut them with a Heart Felt Creations Doily Die!
The Sentiment is from Christmas Sentiments Scrabble Tiles by That Craft Place and I cut them out to add to the tags in the envelopes.
With the addition of flowers, pearls, wooden Christmas tree and then white gesso snow (all from That Craft Place that was it!

Here's the close ups:


Thank you so much for stopping by at this busy busy time of year and I really hope you continue to enjoy the holiday festivities xx

Crafty hugs

Sandie xxx

Challenges:
Papertake Weekly - choose a challenge; I chose AG
Love to Create - 147 Icy Winter Days
Penny's paper crafty challenge - 208 AG
Not just cards - 9 AG
Just Inspirational challenge - Christmas
A Random Fan - 21 AG
Inspiration Destination - 12 AG
Inky Impressions - 190 Winter wonderland
Art by MiRan - 22 AG
Sweet Lilac Flowers - Dec/Jan 15th; AG

Wednesday 24 December 2014

Twas the night before Christmas...


Hello again,

What more perfect way to say Happy Christmas to blog land by making you all card using the gorgeous sentiment stamp from Inkylicious - 'Twas the night before Christmas, when all through the house not a creature was stirring, not even a mouse' ....


MERRY CHRISTMAS TO YOU ALL AND WISHING YOU ALL A TOTALLY AMAZING 
NEW YEAR XXX

Here's what I used:
Images: Wryn Goes Carolling by Tiddly Inks; she was the free set on a magazine and came with the gorgeous penguins who are also Tiddly Inks x
I have coloured them with my Graph'it marker pens onto 300gsm white super smooth card.  Then I used silver metal melt around the edges to add a mystical feel.  I added London Fog momento ink to the edges with a make up sponge.
Backing: central images are triple layered to give definition and then onto a 7x7 inch card base.  The insert is deep red paper with a square of white in the centre.
I have edged the whole card by running a line of Cosmic Shimmer Acrylic Glue (keeps its definition when dry) and then sprinkling silver glitter over the top.

Supplies: 300gms super smooth card, matting paper and card, card bases, Cosmic Shimmer Glue, Glitter, Embossing powders all available from That Craft Place

Here's the close ups:


Thank you for popping by on this Christmas Eve and I really do appreciate all your comments xxx

Happy Crafting and Happy Christmas

Sandie xxx

Challenges:

Tuesday 23 December 2014

A little touch of red..just because...

Hello again,

This one is just for fun!  Its one of the makes I made for my own orders so I thought I'd share it with you before the big day takes us away from blogland to the land of smiles, squeals and joyful family time :D


Here's a shorter guide to this make than my normal ramblings lol:

The image is the totally gorgeous Sophie Victorian Digi Stamp by Scappers Delights that I have had for a while but not managed to use!  She was coloured with my alcohol markers, I use Graph'it marker pens.
I was pretty pleased with the colouring when I'd finished...I seem to be getting there slowly lol

The snowflakes for the edging were cut out on my silhouette and you know me and over-hanging!  Couldn't resist lol
I have layered upwards to add height and added flowers and bling - and yes, I've used those glitter balls again! hehe
For embellies and a huge range of papers, paints, bling and so much more visit That Craft Place

Here's the close ups:


Thank you so much for popping by, especially at this busy time of year :D

Happy Crafting :D

Sandie xxx


Challenges:
Glitter and Sparkle - 116 - traditional Christmas
Use Your Stuff challenge - 166 AG
A Random Fan - 21 AG
Creative Inspirations - 294 Christmas
The Paper Shelter - Christmas
Brown Sugar Challenge - 125 Christmas
Creative Fingers - 61 AG
Art by MiRan - 21 AG
Treasured Times Rubber Stamps - 31 AG
A Gem of a Challenge - 134 AG

Monday 22 December 2014

Another Christmas make....words can say so much...

Hello again,

I spent a day recently at my crafty desk trying not to use a digi image!

I have only been colouring since April (2014!) and before that inking, stamping and distressing was my love, but since discovering my alcohol markers I have not made anything without a focal digi stamp for ages!

The sentiment is one that meant so much to me, reaching out to my family, a time to come together no matter what and just be xxx


So I challenged myself not to use my growing pile of coloured digi stamps and this is one I was very pleased with; still using papers but its one of my fav's from the crafty session...


Here's what I used:
Sentiment: Create with TLC - free sentiments and this is one that really spoke to me and the Christmas feeling :D
Backing elementsShabby Blue Frost Elements Pack 2 by Michele R Designs - Another make just using tags and tickets!  No backing papers were used at all!  I love working with different ways to use our  stash x (the insert was also from the elements pack.
Colour: Instead of ink I used Cosmic Shimmer Gilding Wax!  I had real trouble to get the lustre to show up on the pics so you will just have to trust me, its gorgeous lol  Cosmic Shimmer products are available at That Craft Place
Embellies: varies funky ribbons, bling and a die cut from a Joy Crafts die (butterfly border) - from That Craft Place

No here's how because as you can see, its just all layered.  I cut an 8x8 inch card base down to 6.5 inch square so I could hang over and still get it in the envelope for mailing!
I laid the central sentiment once matted onto the base card roughly were I wanted it and used a pencil to lightly mark the edges on the base card.  This meant when I removed it I knew how much of the base card I needed to cover with my random placing of the tags and tickets.  Once done and glued down I then used foam tape to layer the sentiment in place...then add bling!

Here's the close ups:


 Thank you for stopping by and I hope you leave me a comment before you go as I love to read them and I really do appreciate the time you take to do it xxx

Happy Crafting :D

Sandie xxx

Challenges:
Whoopsie Daisy - Dec AG
Use Your Stuff - 166 AG
Not Just Cards - 9 AG
Just Inspiration - Blue and white
Creative Card Crew - 77 AG
Tuesday Throwdown - 225 Christmas
Creative Inspiration - 294 Christmas
Word Art Wednesday - 163 AG
Inspiration Destination - 12 AG
Scribble and Scrap - 34 AG

Sunday 21 December 2014

Anything Goes...That Craft Place Challenge take a peek...

Hello Again,

Well, it's almost the big Festive Day but before we get covered in wrapping paper and boxes I would love to share my DT inspiration for That Craft Place Challenge Blog
The theme is Anything Goes so let your creativity run wild and come and join us!

Here's my make...


Happy Christmas to one and all :D xxx

Here's what I used:
Image: Sugar Plum from That Craft Place
Sentiment: Christmas Style Scrabble Tiles from That Craft Place
Backing: still on a mission to use up some of my stash, the paper is a DoCrafts collection from many moons ago, but for new designs check out That Craft Place shop
Embellies: White Gesso, cosmic shimmer embossing powder (mint), flowers, beads, Crown from Dutch Doobadoo, lace and a bulldog clip!  That Craft Place has a full range of fabulous embellies and mixed media supplies

Here's How:
I matted the backing paper onto a double layer of blue then green card to add colour to the design, and then did the same for the next layer, offset to add height.
The image is coloured with Graph'it Marker pens on 300gsm super smooth card (From That Craft Place) and then again double layered and offset.  I sprinkled cosmic shimmer mint embossing powder around the image and heated from underneath to add the fairy dust effect (you'll have to trust me that the shine is amazing in real life!).
I then arranged the embellishments randomly to the edge of the piece.  I like the jumbled look!  And then I used a glue spreader to add white gesso randomly all over the place - my version of snow!
Add an insert of matching paper and voila!

Here's the close ups:


Thank you for visiting and I would love you to leave a comment and become a follower of my crafty tales:D

Don't forget to check out That Craft Place and here's how:


Useful links for this make:


That Craft Place - shop full of lush crafting goodies
That Craft Place Challenge Blog - Challenge blog
That Craft Place Facebook Shop a place to buy
That Craft Place Natter & Chatter Facebook Group a place share and chat