Hello there,
You all know how I love new releases...its a thrill to see brand new images and even better to get to play with them!
I shared Tilly-Jayne from the new Button Box Fairy's in an earlier post (you can find it HERE, she was named by me after my youngest!) so today, to kick start the new challenge over at That Craft Place Challenge Blog I'd like to share...
MIXIE
Oh my! I love her :D
Here's the how's and what's:
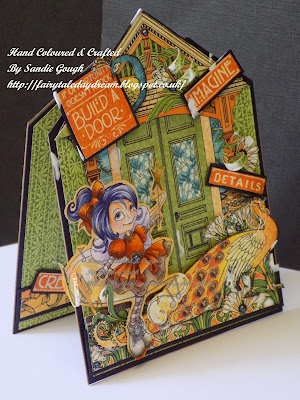
Mixie Button Box Fairy was coloured in Copics, and cut out leaving a 2mm edge, I didn't cut into all the little spaces around her musical swish (because that's way to fussy) and here's a TOP TIP so you don't have to either!
Use a coordinating ink pad (I used Spiced Marmalade Distress Ink) with a cotton bud! Yes I did say cotton bud...soak up some ink on the end of the cotton bud and sweep the edge of the image as you would with a large ink sponge, then very lightly in a circular motion begin to build colour in the white spaces. Lightly does it because you can always add more but you can't take it away lol
The backing is Artisan by Graphic 45, I used the signature sheet and cut out all the elements I needed from ONE sheet of 8 x 8! Just goes to show now versatile the papers are.
I wanted to use the door with her and so I cut out tiny flower details to edge it from the scraps! - don't throw your tiny bits of G45 till you've double checked to see if there is a tiny something you can cut out and add lol Its so much fun and a great sense of satisfaction! (I may need to get out more lol)
The words are also from the same sheet, its the backing to the sheet and I layered the words to read from from to inside:
'If opportunity doesn't know, Build A Door!' 'Imagine Detail' 'Create Details' - my thought for the day :D
Another TOP TIP before I go...the edges of the birds have been treated to a little swipe of my black ink pad! My cutting wasn't perfect and I wanted to make them stand out a little so edging with the ink pad not only covers an tiny imperfections it also adds depth :D
The final piece will fit into an A6 envelope because I cut off 2cms from the bottom before I layered the card to allow for the roof overhang :D
All supplies can be found at THAT CRAFT PLACE
List: Kraft Card, Cosmic Shimmer Glue, sticky pearls, scissors, black card, Graphic 45 Artisan 8x8 paper pad, Pinflair Glue Gel, Distress ink, Black momento ink pad and time to cut :D
Here are the close ups:
Thank you so much for stopping by and please join us this fortnight in the That Craft Place Challenge, the theme is Shabby Chic!
That Craft Place Etsy Shop is well worth a visit too, these new images are a must have :D
Happy Crafting :D
Sandie xxx
Challenges:
http://littleclairesdesigns.blogspot.co.uk/2015/05/monthly-blog-challenge-57-outdoors.html 57
http://craftycalendarchallenge.blogspot.co.uk/ with wings
http://cheerfulstamppad.blogspot.co.uk/2015/05/fairies-come-out-on-this-blog.html fairy's
http://avenue613.blogspot.co.uk/ 125 ag
http://scribbleandscrapcrafts.blogspot.co.uk/ 45 ag
http://allsortschallenge.blogspot.co.uk/ 312 birthday challenge
http://artbymiranchallenge.blogspot.co.uk/ 32
http://scrap-craft-inspiration.blogspot.co.uk/ 9 colours of spring
Sunday, 24 May 2015
Brand New Button Box Fairy's at That Craft Place
Labels:
Black card
,
Button Box Fairy's
,
Copic's
,
Distress Ink
,
Graphic 45
,
momento ink
,
Pearls
,
Pinflair Glue Gel
,
That Craft Place
,
That Craft Place Challenge Blog
Subscribe to:
Post Comments
(
Atom
)


Love your choice of colours Sandie, they make for a delightful card with the pretty image and your attention to detail.
ReplyDeleteThanks so much for joining our birthday celebrations at Allsorts, good luck with the big prize draw and don't forget the DT have more prizes on their own blogs.
B x
A stunning project here and just love Mixie so cute and beautiful, love the array of gorgeous colours.
ReplyDeleteHugs Anna xx
Bright and beautiful. Love the design and layout. Creative Blessings, Tracy x
ReplyDeleteHi Sandie, gorgeous card I think the image is lovely and love the design. Thanks for the little tips, so useful. Hugs Jennifer xx
ReplyDeleteBeautiful card and cute fairy
ReplyDeleteThis is fabulous Sandie, I love the fairy and gorgeous papers.
ReplyDeleteHugs
Linda xxx
Wow this is amazing. What fabulous detail you've used. Great cardvx
ReplyDeleteThis is just fabulous. Such detail and work on this creation. Its Wonderful. Thanks for joining us this fortnight. Lisa DT Scribble and Scrap Challenge
ReplyDeleteGreat job, Sandi! I love the sentiment and your use of the designer papers. Very nicely crafted! Thanks for dropping this off by our house here at 613 Avenue Create!
ReplyDeleteHugz,
Chana, Owner
Sandie she's beautiful and looks full of mischief! Thanks for joining us at 613 Avenue Create and I hope you'll join us again soon.
ReplyDeleteHugs,
Em AKA Creative Em
613 Avenue Create DT
Stunning project Sandie and loving your "top tips". Lou x
ReplyDeleteGorgeous creation.. love how the colour of the image blend perfectly with the patterned paper.. Thank you for joining our Anything Goes challenge # 32 at Art by Mi Ran challenge blog.. Hope to see you again in our next challenge.. Good luck.. ;)
ReplyDeletehugs,
~RoRa
This is so awesome...I love everything about it---the colors, the DP's, the shapes, lay-out, what more can I say. Superb job. Thank you for joining us this week at 613 Avenue Create. Have a blessed weekend.
ReplyDeleteJO ANN
http://jatterburycreations.blogspot.com
Beautiful card. Thank you for joining us at Crafty Calendar this month
ReplyDeleteBettyxxx
Beautiful card. Thank you for joining us at Crafty Calendar this month
ReplyDeleteBettyxxx