Sunday 26 April 2015

Anything But A Card over at That Craft Place...

Hello again,

Over at That Craft Place Challenge the theme this fortnight is No Cards!  A theme that used to fill me with dread, but I think the uber talent of my design team must be rubbing off coz I don't shake anymore...I just panic a little lol

So here it is, my design team inspiration for No Cards!

I used 3 of the Creative Expressions Betty Stamp Sets to make this altered cube into a paperweight!

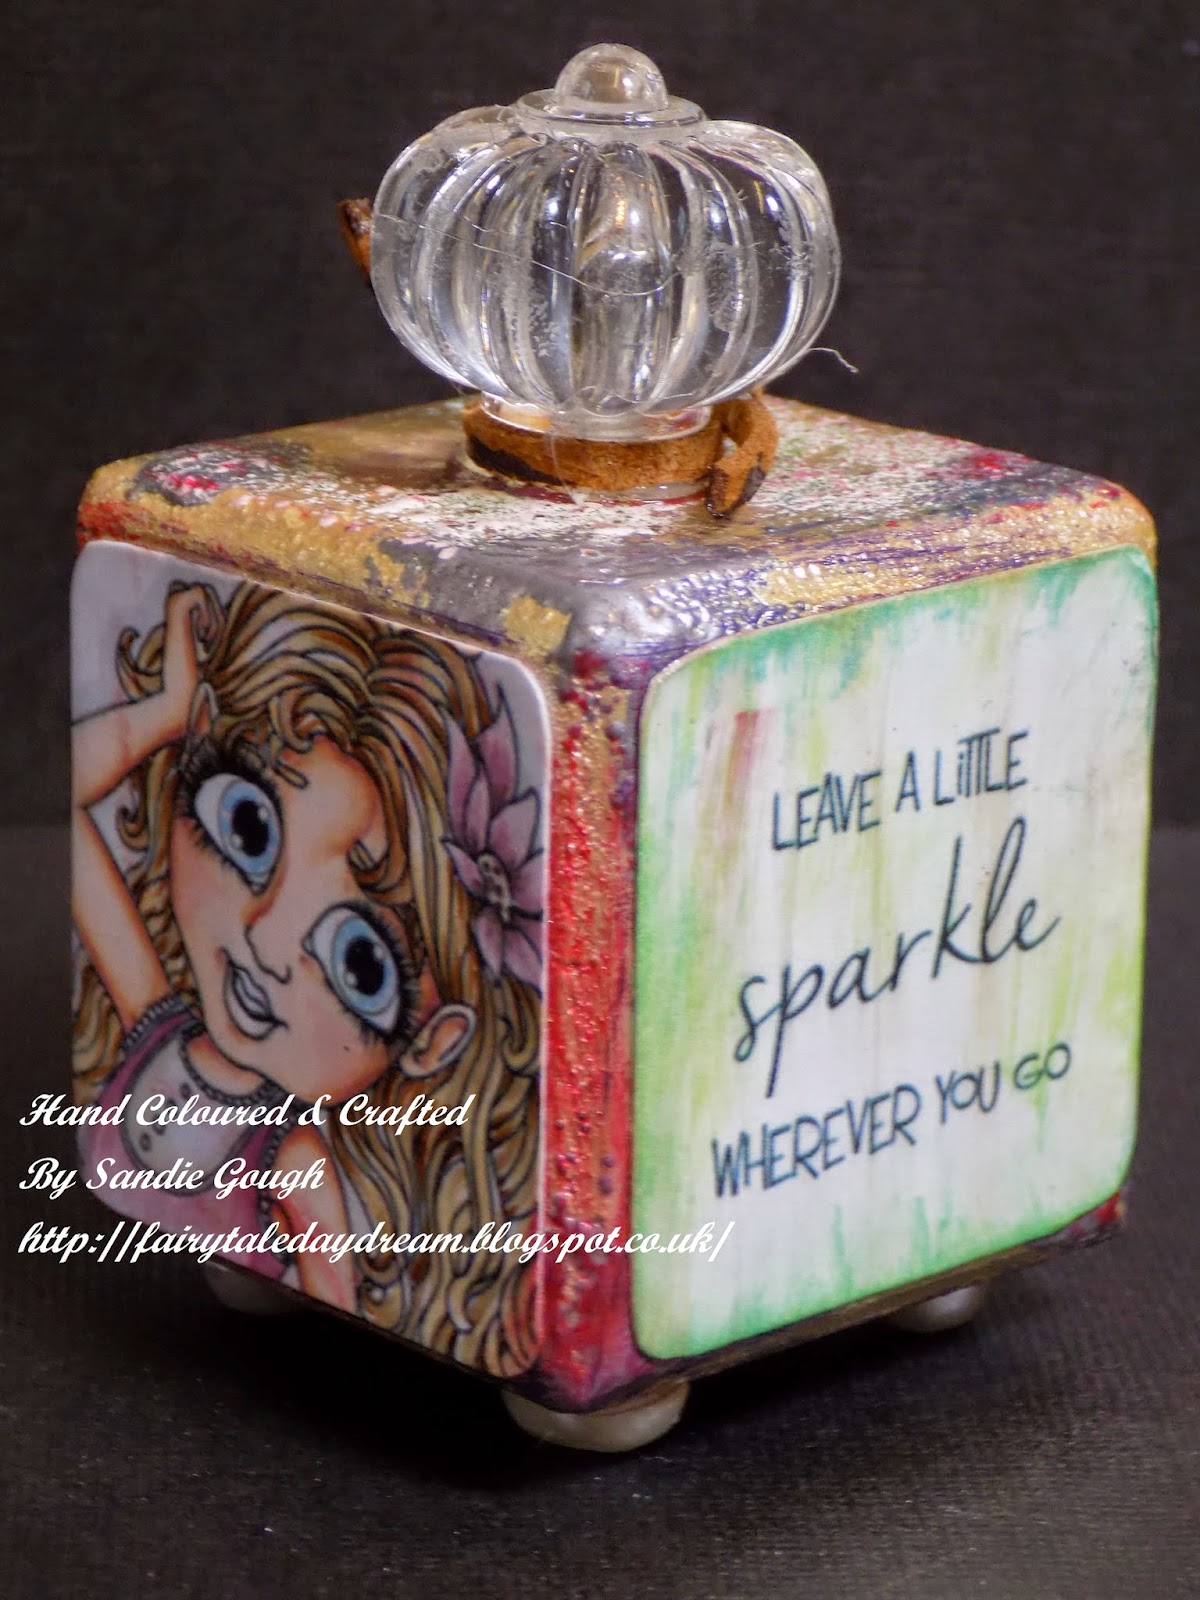
One sentiment from the stamp sets...

Pic shows the base of the paperweight!
I was super pleased with how this came out I can tell you and it is actually one of the samples I made for the Creative Expressions Stamp Launch at Stitches Trade Show earlier in the year but wasn't allowed to share at the time.

There are 8 Creative Expressions Betty Stamp Sets to choose from and ALL are available at That Craft Place (or any Creative Expressions stockist).
Don't forget that other Betty Stamps can be found at That Craft Place Etsy Shop in digital format along with the fabulous Sugar and Spice digital stamps.

Here's the what's for this one:
The base is a wooden block (mine measured 2" square and was one letter in a LOVE block set I had for years, possibly from Dunhelms lol) but its the size of a toddlers block so any block will work.
The block is painted with Pinflair Buff it, watered down a little and painted on, and then I melted Metal Magic and Shabby Green Frantage on the corners and down some of the edges.  Really there is no rules to this, just make it different!
I coloured 3 of the stamps up with Copics and stamped one of the sentiments.  All were cut down to a little under 2" square and I rounded the corners with scissors as it was too small for a corner punch.
I used gloss medium to stick them on (its super sticky) and the stuck a cheap plastic draw knob to the top and flat backed pearls to the bottom for feet!
Add a little cord to the top and then gloss the whole thing to seal the colours and paper together, it also makes the colours pop!
All the supplies used can be found at That Craft Place FB group or from their actual shop shop which can be found via the new gorgeous Website.... http://www.thatcraftplace.co.uk/

Here's a couple more pics...


I was so honoured to work with Lisa Ditzie Horton on the launch samples for the Creative Expressions Betty Stamp sets launch along with the design team and I will share some more of my samples soon :D

That Craft Place Challenge starts now and so get your thinking caps on and enter the No Cards challenge.

Happy Crafting :D

Sandie xxx

Challenges:
http://toptiptuesday.blogspot.co.uk/ three images
http://www.addictedtostamps-challenge.blogspot.com.au/ 141 ag
http://ema-ginationstation.blogspot.co.uk/2015/04/AG-30.html 30 ag
http://artbymiranchallenge.blogspot.co.uk/ 30 ag
http://avenue613.blogspot.co.uk/ 121 ag
http://buckwellscraftychallenge.blogspot.co.uk/2015/04/buckwells-crafty-challenge-colour.html April colour palette in my images

Friday 24 April 2015

'Dreaming'...From the pen of the fabulous Slinky Tart

Hello Again,

It's another Friday DT inspiration from me today showcasing the amazing art of Tamara van Wijk aka Slinky Tart

Looking back over my last few weeks of blogging I seem to have been in a very eclectic mood lately!  I really have swung around just about every medium in the last few weeks!  At least you can't say I'm stuck in a rut lol!

Today, I've gone all girly again, because this image just cried out for a garden to dream in!

Here is...Dreaming by Slinky Tart

Lots of layers as she's looking over, wandering

I didn't have many scraps this time, so I used coordinating cardstock as the insert, just adding a touch of the matching paper as a banner at the top.
Here's the how's and what's:
I have coloured Dreaming with copics and then die cut her and the mats with My Favourite Things Pierced Circle Stax die's (yes, again lol but they're my fav!).
All the mat's (not the image) where then embossed using an embossing folder from Crafter's Companion magazine issue 6 (its packed full).  The sentiment stamp is also from the magazine freebies x
The gorgeous papers are all from Time For Tea Botanicals by Graphic 45 and you can get this and all of my lace and embellies from That Craft Place
I have on this one made all my own flowers...and I love the fan flowers, first time I have done them and I think they look awesome :D

Here's the close ups:


Thank you so much for stopping by, and if you like what you see, it would be great if you clicked to follow my little blog so I can share with you next time too :D

Here are the important links for you to check out:
Slinky Tart Blog to see the rest of the gorgeous DT's inspiration makes :D
Slinky Tart Shop to check out the awesome Slinky's on offer :D
Slinky Tart FB group to share your Slinky Tart makes and see what everyone else have been working with...its a great place to get more inspiration, especially if your mojo has gone for a little holiday! lol

Happy Crafting :D

Sandie xxx

Challenges:
http://lilpatchofcraftyfriends.blogspot.co.uk/ #8
http://fitztownchallengeblog.blogspot.co.uk/2015/04/april-70-use-flowers-and-or-leaves.html
http://craftingfromtheheartchallengeblog.blogspot.co.uk/ #56
http://cutedaisymay.blogspot.co.uk/ April, flowers
http://craftyourpassionchallenges.blogspot.co.uk/ #258
http://toptiptuesday.blogspot.co.uk/ 3 of something; 3 pinwheel flowers
http://www.addictedtostamps-challenge.blogspot.com.au/ #141
http://creataliciouschallenges.blogspot.co.uk/ #74 embossed

Friday 17 April 2015

There's something special going on today at Rosey Hearts...

Hello again,

Well, as its Friday I know that I want to share with you a fabulous image from Rosey Hearts but there's a 'but' today.....

Melissa came up with a new digital stamp and I challenged the team to all make a project with the same image to show just how versatile stamps can be!

I also have my coloured release pic for you (got to do the day job lol) but you will have to scroll down to see that one lol

You need to hope over to the main ROSEY HEARTS BLOG to see what other members of the team have been up to with the same image...

The image is Up Do!


She is totally funky!

I have kept the design simple...
Crafters Companion - coordinations cardstock, Embossilicious 8x8 embossing folder, guilding wax, Die'sire Ivy Die
Rolled flowers from the waste cut with a 1" circle punch, bead centres from my stash and a Sukura Gelly  Glitter pen for highlights.
That Craft Place - black cardstock, Super Smooth cardstock for my Copics, Copic refills and Copics, Cosmic Shimmer Acrylic glue (my fav glue)

Here's the close ups


I adore gilding wax over embossed card!  So easy yet so so so effective x

As promised....here is another MERMAID so I don't let my New Release Team down lol.....


She's dreamy....Coloured with my Copics and my now infamous bubbles lol

Hope you have enjoyed your visit, and please follow my blog so you don't miss tomorrows post!  Its gonna be a fun one x
Remember to pop over to the main blog HERE as the team have worked hard to bring you a variety of styles with the Up Do image....

Happy Crafting :D

Sandie xxx

Challenges:
Sister Act challenge - 102 ag
Digital Sweet challenge - 133 ag
Chocolate coffee and cards - 89 use a die cut
Moving along with the times - anything but square
Creatalicious - 74 embossing
Crafting from the heart - 55 ag
Not Just Cards - 17 ag

Wednesday 15 April 2015

Guest Designer over at Karleigh Sue Challenge

Hello again,

I was asked recently by a good friend to guest DT over at the Karleigh Sue Challenge Blog for their Pin Up Challenge and of course I couldn't refuse :D

The theme is 'Foolish Thoughts' and I was given the perfect image to play with:

Image: The Sea Can't Hold Me by Karleigh Sue Digital Stamps


I thought I'd try a DL make for a change...I realised I have never blogged one and haven't even made one for omg it must have been years!
I really enjoyed the challenge so may well make some more this shape, watch this space lol
I made my own DL as it was easier and means I am not limited by the card blanks I have, DL envelops are also easy and cheap to get so another plus!

Here's what I used:
Crafters Companions: Centura Pearl Hint of Gold A4 card (cut to size; using the Ultimate Crafters Board I scored at the tri-fold A4 line and then folded, this gave me the DL and I simply cut off the rest).  The left over piece of card was used as the mat on the front :D  you know how I hate waste lol
That Craft Place: 160 gsm super smooth card; copics, copic refills; twine;
Very CAS make for me...the only embellie is a safety pin (colour tinted with Copics) and 3 charms.  I made the jump rings with craft wire and then added them with bakers twine.
My Favourite Thing: Dienamic Pierced Circle Stax die set....I know, that one again!  Seriously I think I'm addicted and may need an intervention lol or a new die set to play with! lol
The other card used was purchased at the NEC last month, and that is about it :D

Here's the close ups:


Hope you like my new way of adding my Copic colours(the blob was my dark blue Copic!) lol I saw it on a fellow blogger's post and thought what a super idea :D  I love how blogs enable us to share ideas, but the downside is we just want more and more stash! lol

Thank you for visiting and please leave a comment before you go, every one is very much appreciated as are followers, so if you aren't following me already I would love it if you could :D

Don't forget to check out the Karleigh Sue Challenge Blog for the DT's fabulous projects too and it's a monthly challenge so plenty of time for you to join in..you don't have to use a Karleigh Sue image, but it would be grand if you do :D
The Karleigh Sue Digi Store can be found HERE

Before I go a big thank you for Cheri and Rachel for asking me to guest design :D

Happy Crafting :D

Sandie xxx

Challenges:
Little patch of crafty friends - 7 ag
Crafting from the heart - 55 ag
Not Just Cards = 17 ag
Craft Your Passions - 257 ag
Tip Top Tuesday - 3 of something = I have 3 charms
Creative craft cottage - 37 use die cut
613 Ave Create - 117 AG
Creative Ladybird challenge - 2 ag

Sunday 12 April 2015

Alter It...a challenge best tackled by two!

Hello again,

A word of warning - this is a picture heavy post, even for me! lol

It's a new challenge at That Craft Place Challenge Blog and the theme is 'Alter It', not really in my comfort zone so this looked like the perfect challenge to get reinforcements...in the shape of our youngest daughter, Tilly Jayne :D

Now Tilly is 7yrs old and when I tell you that the only bit's I did for her was to cut the paper at the beginning and hot glue the pearl string, you will understand my amazement and I've got to say a tiny bit of jealousy too!  Just how crafty is she going to be!

Well....here goes!
Our pen pot/desk tidy tutorial (Tilly was so excited when I told her we were going to do a tutorial, it was so cute!)...

1. Use a Pringles tin (empty of course) and cut on a diagonal approx 13 cms from the base (at the highest point)
You will need 2 coordinating papers, one 12x12.  Cut a strip from the 12x12 paper measured to your highest point (so in ours, it was 13cms).  If you have double sided paper your good to go, but as we didn't we added a strip both ends at 5cms wide to make the ends double sided.

2. Cut the coordinating paper to fit the front (lowest point) of your tin at approx 10cms wide
 Glue in place and cut off the excess.

3. Cut the front to approx 1cm above the curve of your tin and then cut down 1cm and feather the edges (see pic), then stick the feathered bits down.  

4. Cut the long piece in half.  Glue the inside of the paper BUT on the double sided end only glue the bottom and have a line of glue approx 5cms in (so there is no glue on the front end if that makes sense lol)...
 The 7yr old face-bombing at this point is optional but hey, go with it! lol

5. Wrap and glue the other half (they will overlap at the back but this adds strength) and trim to 1cm above the top, and once again cut down, feathering the edge, then push over and glue.  
 You can see why no glue on the ends in these two pics....

6.  Use a pencil or small paint brush to roll back the two ends at the front, revealing the 2nd paper underneath

7. Line inside with old book pages, we used a thesaurus that has been used for so many things lol
The decorate to your hearts content!
I love the rolled back front because it gives a focal point, but also gives a lot of possible looks using embellishments, so you'll want to make it again :D

Right...enough waffling, now you can join my pain and guess which one is mine!

Right image: Is mine....Left image: is Tilly's
Wow right!  or left in this case!
Here's a couple more pic's if you can take it...scroll past if you've had enough pics lol but I wanted to showcase the work as I promised I would, she is going to be so happy when this post is seen :D

Remember, this one is mine, the pink one above left is Tilly's!

 Proud and jealous Mummy day :D

All supplies, apart from the Pringles (although if you ask nicely Lisa might get you some lol) are available at That Craft Place.  Stocks of flowers and lace do change with the times but Lisa is always crammed to the rafters with  lushous goodies so you will be able to fill ya boots :D

Don't forget to check out the main blog to see what my uber talented teamies have made and to enter the challenge...just click...

That Craft Place Challenge Blog

Happy Crafting :D

Sandie xxx

Challenges:

Friday 10 April 2015

Rosey Hearts Inspiration....

Hello again,

I know, twice in one day!  I need a lay down! lol

This week I'm sharing a make using a darker image from Rosey Hearts, or at least that's how I interpreted it!  I had wanted to try a monochrome look again with my Copic's so this seemed the perfect image to do that with...I added just a splash of colour...hope you like it :D

Image - Dragon Girl by Rosey Hearts


As this was a fairly simple make, just lots of layering I won't bore you with a 'how to' this time, I'm sure you're all now doing a happy dance lol

So here's what I used:
Image: Dragon Girl coloured with Copic's; I used the E50's plus E49 on the girl to get the monochrome look
6x6 inch card blank
Backing papers - from The Works
Black card stock, buttons, string and bakers twine
See told you it was a simple make :D

Here's the close ups:


Thank you for stopping by and don't forget to hop over to the Rosey Hearts Blog to see the gorgeous creations the Design Team have been up to this week :D

Don't forget, the Rosey Hearts Etsy Shop and there is also a monthly challenge too, you can still enter this months if you hop on over HERE

Happy Crafting :D

Sandie xxx

Challenges:
Scribble and scrap - 41 ag
Art by MiRan - 29 ag
Creative Fingers - 75 ag
Sister Act - 101 ag
Crafty Catz Weekly - 2 or more patterned papers; mine has 2
Inspiration Destination - 28 ag
Crafting for all seasons - animal magic; mine has a little dragon
Crafting Inspiratons - 308 Trio of.... Mine has 3 buttons, & 3 pearl brads